If you are into woodworking, a finger joint bit router is a must in your toolbox. This tool helps in lengthening wood works if you want to connect one piece of wood to another.
It does make woodworking easier and faster, but I have to say that without the right instructions, it would still be difficult to use.
Don't worry, because today, you will learn how to use a finger joint router bit by the end of this article.
More...
What is the finger joint router bit?
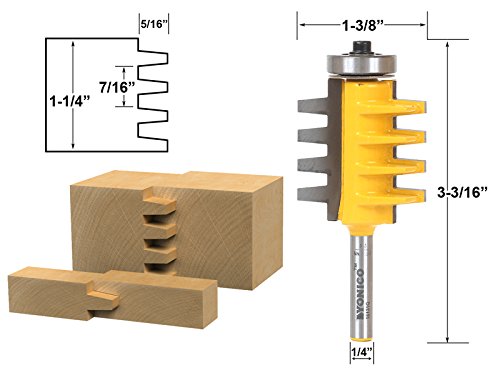
It is a tool that creates the accurate spaces that a wood needs in order to have another piece of wood connected to it.
Although you could probably do it manually but let's face it, you will just consume a lot of your time and effort when you could've just used this tool and get the work done.
This tool usually has carbide teeth that are micro grain in nature with 6 cutters that are detachable.
Ideally, you use this for a piece of wood that could go up to 5/8 inches and it could also handle a wood that is 1 to 1/8 inches thick.
Now, for the fun part, continue to read on for the complete quick tutorial on how to use this tool.

Via: Amazon.com
Read more —
8 quick step procedure on using the finger joint router bit
Step 1: Arrange the finger joint router in a bit body that is aligned to the thickness of the piece of wood that you want to be cut or shaped.
Step 2: Make sure that the wood that you want to get the work done is placed in a coping sled. This would make sure that the wood will stay in place and it won't dwindle while you try to make a cut from the finger joint router.
Step 3: Make a small center mark to find the exact center point of your material. This will be your guide in creating the spaces or the shape that you want before you have it cut.
Step 4: Check if the mark that you made aligns with the finger joint router and its edges. If not, you could always adjust it either you raise the joint router or you lower it.
Step 5: Set a fence angle by using a ruler. You must do it at the bottom of the joint router.
Step 6: Ready your fence on the working table and have it protect the joint router before you start running your wood with it.
Step 7: Lock the fence as soon as you have set it up, so it doesn't move and get in the way of your project.
Step 8: Slowly run the wood to the finger joint router using your coping sled to make a precise space or shape on the wood that you are trying to get done. The first cut must be faced up, while the next cut has to be facing down.
In the event that your wood pieces don't fit, you can always make an adjustment.
To do it, you must determine which part is too thick. From there, you could always change half the distance that two wood were originally set.
This will solve the issue and you will have two pieces of wood joined perfectly like a puzzle piece meeting another puzzle piece.
Finishing touches
It is not enough that you just leave your project without doing some finishing touches. This process is especially done in woodworking.
Step 1: Get a miter gauge or even a push block could work in feeding the pieces that you just finished cutting.
Step 2: Glue them together to make sure that they don't fall apart or to ensure durability.
Step 3: Sand the two pieces of wood so they look perfect and presentable.

- Specs: Bearing Dia. 1-3/8" (35mm), Cut Depth 5/16", Number of Cutters 2, Overall Dia. 2", Overall Length 4-1/4", Shank Dia. 1/2", Carbide Height 1-9/16"
- Route strong joints in material up to 1-25/32" thick
- Easy setup and adjust for different stock thicknesses
- Cuts all composition materials, plywood, hardwood, and softwood
- Use in CNC and table-mounted routers
Here are some of the things that you must be reminded of before using the finger joint router bit:
1. Measurement: Always keep your wood measurement precise. Although you can always do some adjustments if ever you mess it up, it is still best to be exact when it comes to your measurements. This will save you time and energy and even money.
2. Preparation: Make sure that all your equipment are ready before you start dealing with cutting your wood with a finger joint. Always have your materials in places where you could easily reach them.
3. Follow Instructions: This may sound like a cliche but it is often taken for granted. Don't assume you already know how to use this when you haven't used it before. It may really look so easy but without the right directions for you to follow, you might actually cause some accident on your own.
4. Accessories: You need to wear some protective glasses or goggles for this activity, so your eyes are safe from wood dust and other things that might get in your eyes.
5. Router Plugs: Keep in mind that the router has to be unplugged before you could do any alteration in the bit configuration.
6. Router Table: It is a must to own a router table when using this bit. Others would dare to use a handheld router, which is not safe. Don't be one of those.
7. Spacer: When it comes to slot cutters, never forget to use a spacer between them to make sure that all the ends and sides are even.
Via: Amazon.com
Conclusion
This tool is specifically used to join two blocks of wood, which are end-grain in nature. You would often see a finger joint router bit in moldings that are supposed to be painted. This tool is also perfect for joining edge-to-edge wood to make them longer, as long as the wood is flat and straight.
It is always handy to have this in your toolbox because you will never know when you need it, especially if woodworking is something that you do for a living. Nevertheless, it is a must-have and it is good to keep it with you along with the router tables and a coping sled.
- Specs: Bearing Dia. 1-3/8" (35mm), Cut Depth 5/16", Number of Cutters 2, Overall Dia. 2", Overall Length 4-1/4", Shank Dia. 1/2", Carbide Height 1-9/16"
- Route strong joints in material up to 1-25/32" thick
- Easy setup and adjust for different stock thicknesses
- Cuts all composition materials, plywood, hardwood, and softwood
- Use in CNC and table-mounted routers